A Contact Form is an essential requirement for any website these days. It allows the user to be able to send an email to the website owners regarding anything that they may want. The contact forms can be used for various purposes, and these purposes include a simple contact form, an order enquiry form, or even a registration form for an event sometimes. Today, I am going to help you create a contact form without using any programming language. This contact form will be created with the help of Google Drive, which enables you to get the responses either via email or to be displayed in a spreadsheet on your Google Drive account.
Without wasting any more time, let’s get started with this simple tutorial. Before I begin with the tutorial, I assume that you have a Google Account to use. If you don’t have a Google Account, head over to Google and create a new account now!
Contact Form using Google Drive
- Head over to Google Drive by clicking here. Make sure you are logged in to your account and you have access to a similar interface on your computer.
- Now, look for the create button on the left side of the page, and click on form.
- Next, you will be presented with a window where you need to choose the template for your contact form. Choose the one that suits your need and then click on OK.
- Now the interface for customizing your form pops up. Enter the title of your form, and then start filling out questions as per the need. For a simple contact form, we are going to take in user’s name, email ID and the message for us.
- To make sure that the user fills in an email address in the email field, click on Advanced settings and then choose the following settings for the Email field.
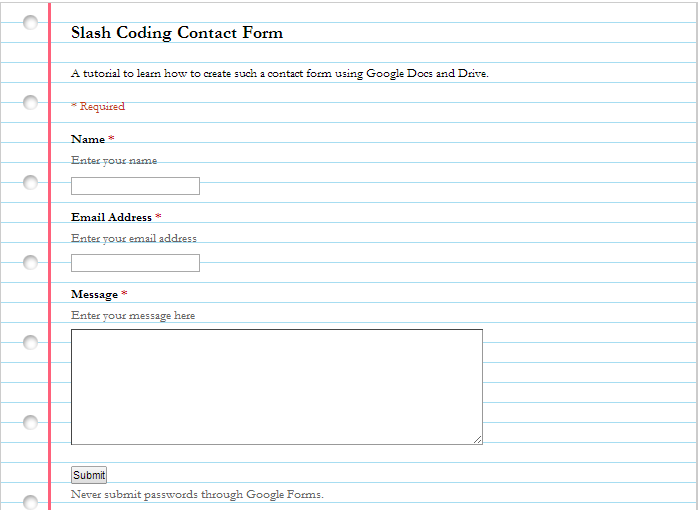
- This is how the entire form looks like for me. It may look a bit different if you varied the fields that you entered.
- Now, change the response text in the box down, below the form you just created and choose the settings that you want.
- Last, but not the least, choose the way you want your responses to this form to be recorded. Do this by clicking on the Choose Response Destination on the top menu bar and then filling out the name for the Spreadsheet for your responses.
- Well, that’s all. You are ready to submit your form and view it on the web. Do this by clicking on the Send button on the bottom of the page. It will allow you to either embed the form in your webpage or, just share a link to the Google Form so that everyone can fill it out.
If you want to check out the form that we just created, you can do that now.
That’s it. You just created a contact form using Google Drive, which you can use on your website or blog, or just share its link via email to others or via Social websites. Also, don’t forget to subscribe to Slash Coding for latest post updates via RSS Feeds, Facebook, Google+ or Twitter. We love to hear from you in case you face any problems with this tutorial.