Slash Coding

  • Android Development
  • CSS
  • Subscribe
  • About Us
  • Contact Us
You are here: Home / Web Development / CSS / Creating a professional looking Menu with CSS

Creating a professional looking Menu with CSS

By Aneesh Bhatnagar

A menu on a webpage is something that adds functionality to the website. It allows users to browse through your entire site with the ease of a click. Generally a menu is placed on the top of the webpage, below the logo or the name of the company. Designing a menu in Photoshop is pretty easy, but that is a different thing. Today I will tell you how to make  a stylish and professional looking menu for your website or blog. This will be a simple menu.

Complete View of Professional and Simple CSS Menu
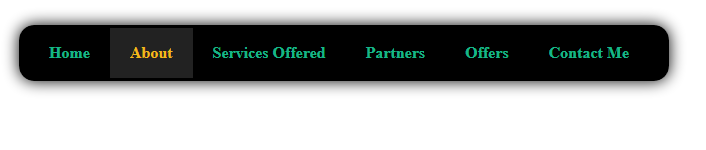
Before we proceed, I assume that you have basic knowledge of HTML and CSS and are aware of the various attributes that can be applied to an element. Also, I assume that you have a webpage ready where you want to insert this menu. The menu which we are creating will be like the image above. If you want, you can change the colour scheme of the menu as per your choice, using any valid HEX colour code. For better productivity, you might want to use Notepad++. Read more about it here.

  • Using Notepad++ for enhanced Programming Experience

Professional Menu in CSS

Let’s begin creating our menu. First we will define the structure of the menu in HTML and link the CSS file to the HTML page. In the second part, we will style the HTML code, i.e. add content to the CSS file.

  1. If you do not have a webpage, start by creating a new page and include the following line in the header of the page, i.e. the head tag. It can be placed anywhere before the closing of the head tag. If you already have a webpage, just include this line in your code.
    <link rel="stylesheet" type="text/css" href="menu.css" media="all" />
    
  2. Inside the body tag, define what the menu will be. You can do so by creating an unordered list (ul) and adding each menu item as a list item (li). This is how you can create  a list for your page. Simply copy the code below and paste it in your body tag, where you want the menu to appear.
    <ul id="Menu">
    <li><a href="#">Home</a></li>
    <li><a href="#">About</a></li>
    <li><a href="#">Services Offered</a></li>
    <li><a href="#">Partners</a></li>
    <li><a href="#">Offers</a></li>
    <li><a href="#">Contact Me</a></li>
    </ul>
    
  3. If you look at your HTML page at this moment, you will see it as follows.
    HTML Preview without CSS
  4. Now, let’s begin styling our menu. Open the CSS file in your favorite text editor and add the following lines of code to style the background colour of the menu and the rounded corner. Also, the shadow of the menu will be defined here. You can change it as per your own needs.
    ul#Menu{
    margin-left:50px;
    background: #000000;
    box-shadow: 0px 0px 15px rgba(0,0,0,1);
    padding: 3px 10px;
    border-radius: 15px;
    list-style: none;
    }
    
    ul#Menu:after{
    content: "";
    clear: both;
    display: block;
    }
    
  5. Now, let’s style individual menu item by adding the text colour, font weight and everything for each menu item.
    ul#Menu li{
    float: left;
    }
    
    ul#Menu li a{
    display: block;
    font-weight:bold;
    padding: 15px 20px;
    color: #16b587;
    text-decoration: none;
    }
    
  6. Well, this is what your menu would look now. Even if you take your mouse on any menu item, nothing happens and the user does not get to know what to do at this point. So for this, we do the next step.
    Simple CSS Menu with No Hover Action
  7. Since we need to add some action to the CSS when we hover it, we add the following lines of code to the CSS file.
    ul#Menu li:hover{
    background:#222222;
    }
    
    ul#Menu li:hover a{
    color: #F2B91A;
    }
    
  8. Well, that’s it. You just created a magnificent looking Menu in CSS. It looks professional and simple. This is the final output of our tutorial.
    Complete View of Professional and Simple CSS Menu

If you want, you can download the entire source code for this tutorial from below.

Download Source Code

I hope you learned something new from this blog post. Let me know if you face any problems using the comments section below or by using the contact page to contact me. Stay subscribed to updates of Slash Coding via RSS Feeds, Facebook, or Twitter. See you around! 😉

Did you enjoy this article?
Subscribe to our email alerts when we post something new so you don't miss out.

About Aneesh Bhatnagar

Aneesh Bhatnagar is a freelance web developer, who specializes in front-end website development with HTML5, CSS3 and jQuery. He believes in transforming the entire web into a Responsive Web. He also specializes in use of Bootstrap framework to get websites up and running.

Comments

  1. Rafaqat says

    December 13, 2013 at 12:55 pm

    well explained,hope so it will help a lot edit and give style to my theme menu.Keep adding useful content.

    • Aneesh Bhatnagar says

      December 13, 2013 at 8:11 pm

      I’m glad that my article helped you! Remember to subscribe to our updates! 🙂

  2. David says

    March 23, 2014 at 8:43 am

    Hi Aneesh,

    Thanks for posting this. Just wondering, how can I center the menu? Everything seems to be left-aligned currently?

    Thanks!

    • Aneesh Bhatnagar says

      March 23, 2014 at 9:15 am

      Hey David,

      In the source code that I shared, everything is not left aligned when I run it. Try changing your browser, and if that does not help either, then try this step.

      In the styling for ul#Menu li a, add a line, which says float:none; and you should be good to go.

      • David says

        March 23, 2014 at 1:36 pm

        Thanks Aneesh – I noticed in your code that placed the entire menu in a div and set its width and margin values to…

        margin: 0 auto;

        I just had to adjust the width of this div to centre it as my menu has less items than yours.

        Thanks again

        David

        • Aneesh Bhatnagar says

          March 23, 2014 at 1:38 pm

          Good to hear that you were able to fix it! 🙂

  3. amarjit says

    July 26, 2015 at 1:32 pm

    thank uu so much my frnd. . . for this code i am very happy . . . this 1st time that i make a menu

    • Aneesh Bhatnagar says

      July 26, 2015 at 3:18 pm

      I’m happy I could be of your help Amarjit! 🙂

Search Slash Coding

Follow Us

RSS Feeds Facebook Twitter Follow Google+

Categories

  • Android Development
  • C++
  • Developer Tips
  • Slash Coding
  • Web Development
    • CSS
    • JavaScript
    • jQuery
    • PHP

Recently Published

  • Moving Ahead from Front End and Android Development
  • How to Export a Project from Android Studio
  • What is jQuery? Let’s Answer this Common Question today!
  • Mobile App Prototyping : Pixate Studio
  • How to Create a Countdown Timer using jQuery

Subscribe to Email Alerts

Eager to learn more from Slash Coding?
Sign up for daily email updates when anything new comes up. Get it straight in your inbox.

Follow Us on Social Media

RSS Feeds Facebook Twitter Follow Google+

Copyright © 2025 · Slash Coding · Powered by the Genesis Framework
Sitemap | Privacy Policy | About | Contact

×
Get Notified of the new Tutorials when they are posted!
Never miss any article update from Slash Coding. Subscribe to email alerts today!