At times, you might have seen websites where the selection colour of the text is different than the typical, default blue colour. This thing can be achieved simply by using minimal lines of code in your styling. This tutorial is going to be a very small one, in which I would just tell you the way to change the selection colour and then also change the styling of your text when it is selected. For the demo, I have a sample paragraph just at the end of the tutorial, where you would be able to see everything in action.
Before we proceed, I would ask you to get used to using Notepad++ text editor for creating and editing your files. Notepad++ is a powerful text editor, which can help you create and edit files for various languages. It supports a long list of languages and you can read more about it in the article where I covered Notepad++. Also, you might want to check out these other interesting CSS tutorials for your website as well.
- Using Notepad++ for Enhanced Experience
- A Professional Drop Down Menu with CSS
- Compress CSS files to Boost Loading Time
Now, without wasting any more time, let’s get straight into editing the styling code that we would need to do in order to get the desired effect.
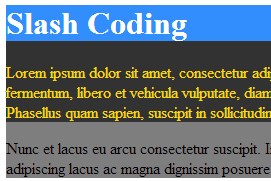
For the sake of this tutorial, I am going to create a simple webpage, which will have a heading, and 2 paragraphs. All these 3 things will have a different selection colour. For the heading, we will have the default selection colour. For the first paragraph, we will have a black background colour with yellow text and finally for the second paragraph, we will have a grey colour background and black text over it. Well, let’s get started now.
HTML Part
The HTML part for this tutorial basically depends on the webpage that you are working on, but for this tutorial, I would be working with an HTML page, which will have the following layout.
<html>
  <head>
    <title>Slash Coding's Color Selection Tutorial</title>
  </head>
  <body>
    <h1>Slash Coding</h1>
    <p id="black">
      Lorem ipsum dolor sit amet, consectetur adipiscing elit. Phasellus elit
      urna, varius ac mi et, iaculis hendrerit dui. Suspendisse potenti. Aliquam
      rhoncus nunc et tortor adipiscing venenatis. Proin quis blandit neque.
      Duis fermentum, libero et vehicula vulputate, diam massa euismod justo, at
      fermentum sapien nisi sed orci. Ut in eros dapibus, ullamcorper erat vel,
      pharetra mi. Nunc commodo mi dignissim, placerat diam id, interdum nibh.
      Phasellus quam sapien, suscipit in sollicitudin ut, hendrerit a nibh.
    </p>

    <p id="grey">
      Nunc et lacus eu arcu consectetur suscipit. In eu mi leo. Fusce vitae
      pulvinar purus. Aenean et turpis hendrerit justo gravida porta sit amet in
      diam. Nam lobortis consectetur mauris, iaculis suscipit massa faucibus at.
      Morbi adipiscing lacus ac magna dignissim posuere. Morbi vehicula semper
      tempor. Cras luctus mauris quam, in commodo velit tempus ac. Morbi
      vehicula urna tincidunt eros convallis, eget scelerisque ante pretium.
    </p>
  </body>
</html>
CSS Part
Let’s get to the pretty simple CSS part now. There is hardly any code to be written in CSS and hence for that, I would include that code in the header of my webpage only. It is placed in the header tags on the webspage.
<style>
  p#black::selection {
    color: #ffd700;
    background: #000000;
  }

  p#grey::selection {
    color: black;
    background: grey;
  }
</style>
Well, that’s everything. You have successfully made your webpage’s selection stylish. Don’t forget to check back on Slash Coding for more interesting tutorials for your website or blog. You can get in touch me via the contact page or the comments section below if you face any problem with this tutorial. Also, don’t forget to subscribe to Slash Coding for latest post updates via RSS Feeds, Facebook, Google+ or Twitter.